Last year, I signed up to be part of C&T Publishing's Creative Troupe. It's been a really positive experience for me. You can get ebooks for free in exchange for your reviews, and every now and then they send out an email with an opportunity to make something out of one of their products. You send the item to them in exchange for 50% off of a purchase from them and a free ebook. It pushes me out of my box a couple of times a year, so it's lots of fun. (I'm not incentivized to write this. I just wanted to pass on the info.)
A few weeks ago, I created a project from their fast2fuse double-sided fusible. I love the product. It was immediately evident why they called it fast2fuse. Dang. It is fast to fuse. It's a thick fusible, but not quite as intense as Pellon's Peltex.
I started out making some complicated mini purse that crashed and burned. Instead of trying to make the material work for a project that I wanted to make, I decided it would be smarter to make something for which product was well-suited. Ultimately, I made this fun Party Garland :-D
It's so easy, you won't need a fancy tutorial. Here's how I did it:
- Find a round object around the house: a glass, a jar lid, the cap from your hairspray, etc.
- Cut strips of fabric a quarter to a half an inch wider than your round object.
- Lay your strips out wrong side up and put the double-sided fusible on top of it; then lay more strips right side up on top of the fusible.
- Fuse on both sides with your hot iron, trace circles, and cut them out.
- At the sewing machine, fold some ribbon in half and backstitch in the fold.
- Then start sewing a chain. At even intervals, sew through the middle of a circle.
- When you run out of circles, sew into another length of folded ribbon.
Shazam. It will go even faster if you can get some help cutting circles.
I've got to go pull a quilt out of the dryer. Pictures tomorrow!
Happy Crafting!
Claire
Showing posts with label tutorial. Show all posts
Thursday, April 18, 2013
Tuesday, February 12, 2013
Giant Macaron Coin Purse Tutorial
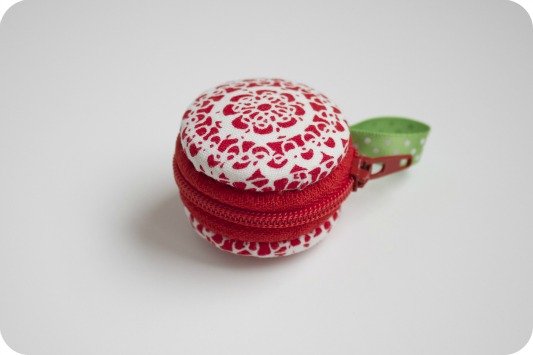
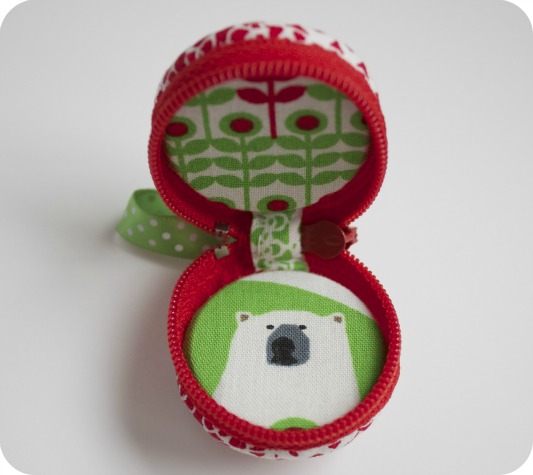
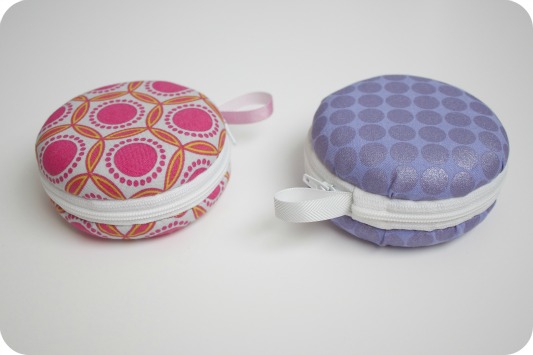
If this adorable Macaron Coin Purse tutorial hasn't made it onto one of your Pinterest boards, yet, you can thank me for helping you rectify this oversight. I made one to swap in the Austin Modern Quilt Guild white elephant gift exchange at our December meeting. I forgot to take a picture, though, so I made another one that I hung on our Christmas tree like an ornament.
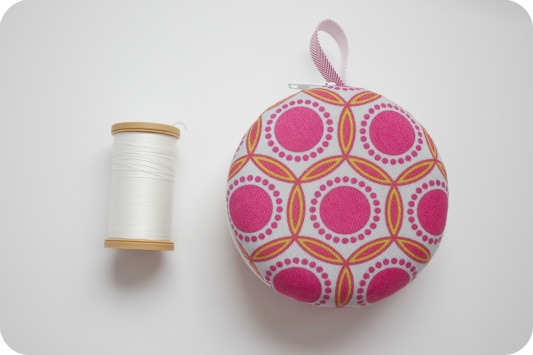
This is tiny, precious, and time consuming hand sewing, to be sure. Unlike a hand pieced quilt, though, you can finish one of these in an afternoon ;-) The tutorial uses 1.5" cover buttons, so the finished "coin purse" is itty bitty. I instantly wanted to make bigger ones. The biggest cover button size you can get is size 100, which measures 2.5". Too small! Plus, I couldn't seem to find that size in bulk, and they cost at least $3.00 per button. Your coin purse needs two.
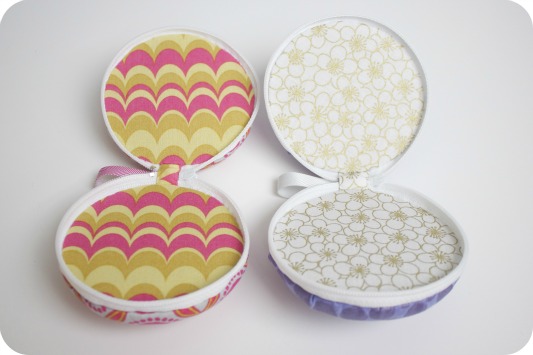
Oh yeah, that's a better coin purse size. The best part is you basically follow the original tutorial to make the giant version. No reinventing the wheel here.
Here are the differences:
1) Since a mini frisbee doesn't come with a back like a cover button, just trace your mini frisbee onto a cereal box and cut just inside the line. You'll wrap this part in fabric in place of a cover button back.
2) My mini frisbees measure 3.5". I cut down a 14" zipper to 12.5". I zipped my zipper closed and measured from 1/8"beyond the end of the zipper pull and cut the zipper off 12.5" from that point. I stitched across the end of my zipper and followed the tutorial instructions from there.
3) I used about a 4" length of ribbon for the loop.
Now get to a party supply store and stock up! These guys are too cute!
Happy Crafting and Happy Mardi Gras!
Claire
Saturday, June 30, 2012
Let's Figure It out Together: Facebook Tutorial
Have you signed up for the 100th blog giveaway?
This little How-To is part of Plum and June's Let's Figure It out Together Series with the Let's Get Acquainted Blog Hop. Folks are writing super helpful posts about how the digital world can support your creative habits, so stop sifting through Google search results. Your crafty peers are happily sharing their firsthand know how.

Having a Facebook page to accompany your blog, brand, or online shop is a great way to share your activities with your existing friends and family, but it's also a very convenient way for new followers to keep up with you.
It's crazy easy to add a new page to your existing Facebook account:
1) Log into your Facebook account and visit this link: www.facebook.com/pages/create.php
- If you're wanting a Facebook presence for your blog, Brand or Product > Website would be a good fit.
- If your main focus is your online shop, then you might choose Company Organization or Institution > Small Business.
- You can still reclassify your page after it's been created, so don't agonize over it too much ;-)
3) Facebook will walk you through the steps to upload a profile picture and fill in some basic info like your site's URL.
5) Invite your friends
6) Get posting.
See! It's completely easy. Now you can update your Facebook page when you update your site or have content specifically for your Facebook followers.
Monday, June 11, 2012
Tutorial: Bobbin Tamers
My Thread Spool & Bobbin Storage Rack tutorial gives a DIY option for rounding up your, er, loose spools, and keeping them organized with coordinating bobbins. Another great idea shared by The Creative Homemaker comes from a post on the Threads magazine website.
The idea is to use clear vinyl tubing from the hardware store and to cut it into slotted rings to wrap around your bobbins. No more bobbin tails unwinding and making a mess.
My neighborhood big box home improvement store (Home Depot) sells smaller diameter vinyl tubing in 10ft lengths. This tubing is measured by outside diameter (OD) and inside diameter (ID). The Threads magazine website described using 7/8" tubing, but their photo showed 5/8"OD x 1/2"ID tubing. Tricky. I eyeballed my Bernina 1630 bobbins and bought some 7/8"OD x 5/8"ID tubing.
When I got home, I peeled off some tape and removed the adhesive residue with goo gone. I eagerly pulled out my intense Cutco shears to slice it into rings, but I quickly found that cutting even, skinny rings was nearly impossible. I cut a vertical slit parallel to the tube and cut off a rectangle of plastic. I thought cutting the rectangle into strips would be easier. Not really.
On another trip to the hardware store (I've been there a lot recently), I tried to figure out what tool they were using to cut the large gauge vinyl tubing for sale by the foot. At that point I turned around and saw the wall of ratcheting PVC cutters. I recognized them froma landscaping project repairing the irrigation system after shattering a pipe with a shovel.
Back home again, I brought our PVC cutters up to my sewing table and successfully cut a perfect ring off of the end of my tubing. Yay! I played around with the size until I found my preferred width. It's still tricky to get perfect 1/16" precision every time, but it's a huge improvement.
The rings fit on the bobbins differently depending on how full they are. On a bobbin that's not so full, you can overlap the ends or cut some length off the ring if you prefer.
I only own about 20 bobbins, and there's plenty of tubing left on my cutting table. If you're interested in some of these without all of the trips to the hardware store, let me know, and I'll put some in my Etsy shop when I get that organized later this month.
If you live to DIY, here's my budget:
• 10ft length of 7/8"OD x 5/8"ID clear vinyl tubing: $7
• Ratcheting PVC pipe cutters: about $12 (I already owned some)
You could easily spend less than $20 for you and all of your quilty friends to have tidy bobbins!
Happy Crafting!
I'm linking up with Sew Happy Geek.

The idea is to use clear vinyl tubing from the hardware store and to cut it into slotted rings to wrap around your bobbins. No more bobbin tails unwinding and making a mess.
My neighborhood big box home improvement store (Home Depot) sells smaller diameter vinyl tubing in 10ft lengths. This tubing is measured by outside diameter (OD) and inside diameter (ID). The Threads magazine website described using 7/8" tubing, but their photo showed 5/8"OD x 1/2"ID tubing. Tricky. I eyeballed my Bernina 1630 bobbins and bought some 7/8"OD x 5/8"ID tubing.
When I got home, I peeled off some tape and removed the adhesive residue with goo gone. I eagerly pulled out my intense Cutco shears to slice it into rings, but I quickly found that cutting even, skinny rings was nearly impossible. I cut a vertical slit parallel to the tube and cut off a rectangle of plastic. I thought cutting the rectangle into strips would be easier. Not really.
On another trip to the hardware store (I've been there a lot recently), I tried to figure out what tool they were using to cut the large gauge vinyl tubing for sale by the foot. At that point I turned around and saw the wall of ratcheting PVC cutters. I recognized them from
Back home again, I brought our PVC cutters up to my sewing table and successfully cut a perfect ring off of the end of my tubing. Yay! I played around with the size until I found my preferred width. It's still tricky to get perfect 1/16" precision every time, but it's a huge improvement.
I only own about 20 bobbins, and there's plenty of tubing left on my cutting table. If you're interested in some of these without all of the trips to the hardware store, let me know, and I'll put some in my Etsy shop when I get that organized later this month.
If you live to DIY, here's my budget:
• 10ft length of 7/8"OD x 5/8"ID clear vinyl tubing: $7
• Ratcheting PVC pipe cutters: about $12 (I already owned some)
You could easily spend less than $20 for you and all of your quilty friends to have tidy bobbins!
Happy Crafting!
I'm linking up with Sew Happy Geek.

Wednesday, June 6, 2012
Tutorial: DIY Thread Spool & Bobbin Storage
Rachel on Stitched in Color pointed out this awesome thread spool and bobbin storage rack from The Creative Homemaker. I pinned it immediately.
My thread lived out of the sun in random organizers in my sewing desk drawers. I made this similar storage rack to fit perfectly on the end of my sewing desk out of direct sunlight. Drawer space reclaimed!
Supplies:
Three 1"x2"x8' smooth select pine boards
1.75 oz. package of #18 5/8" wire nails
E-6000 or wood glue
Four sets of medium 3M Command pictures hangers
reciprocating saw or hand saw
sandpaper - rough and fine grit
painter's tape or scotch tape
pencil
ruler
calculator
1) I bought three 1"x2"x8' smooth pine boards from the big box home improvement store (Home Depot). I knew I wanted to construct the rack like a ladder, so I cut two long pieces measuring 26 and 7/8"for my rails (the sides) and nine shorter pieces measuring 20 and 3/16"for my rungs (the shelves).
2) I used rough sandpaper to smooth out the cuts from the saw and fine sandpaper to barely smooth the edges of all pieces. I picked the smoothest edge of the board to be the front and marked the back with an X.
3) Mr. Pins jumped in with the math to determine how far apart to position the shelves for even spacing. Since the actual measurement of these 1"x2"s is .75"x1.5", the spaces between my shelves is about 2.5" - give or take 1/8" here and there.
4) I relocated to my sewing room for the assembly. With the backside of the rack facing up on my cutting table, I taped all of the shelves to the two long side pieces.
5) I flipped the whole rack over by squeezing tightly with my arms when I picked it up. I scooted one side past the edge of the table and used the tape as a hinge to expose the ends of the shelves where they touched the long side piece.
6) I dabbed E-6000 glue on the ends of the shelves before hinging the side back against the ends of the shelves. Then I scooted the whole rack back over to rest on the table again.
7) I taped each shelf to the long side piece on the front side of the rack to serve as a clamp while the glue dried. I wiggled the rack to make sure that it was in line with the edges of the table, that way I knew it would dry at right angles. I let the glue cure for an hour or so, then I repeated this on the other side of the rack to glue the shelves to the other side piece. Then I went to bed.
8) The glue was completely dry this morning, so I used one of my nails and a bobbin to decide how high up on the edge of the shelf each nail would need to be. I didn't want my bobbins to stick up over the edge of the shelves and make the spools of thread harder to remove.
9) I measured and marked a horizontal line on the front sides of the 8 shelves so I would know where to draw dots for the nail holes.
10) I used spools of thread to determine that I can fit 13 spools on a shelf. I wanted the spools on each end of the shelf to be 3/4" from the sides. I measured from those points to mark the spot for the middle nail. Then I kept dividing numbers to find middle points until I made marks for 13 nails. They're all about 1 and 9/16" apart.
11) I used a 24" acrylic ruler to help me mark nail spots on 8 shelves. (The 9th "shelf" pieces is the top of the rack, and I didn't want to put bobbins on it.)
12) Once I marked all of the nail spots with a pencil, I came back around with my hammer and tapped each of those holes with a nail to visibly indent the wood.
13) Then I erased my horizontal pencil lines.
14) I'm right handed, so I worked from right to left barely hammering in #18 5/8" wire nails for the bobbins. Once I had a row of nails set, I centered a bobbin on each nail and hammered the nail just deep enough so that the bobbin could rest on the nail with the head of the nail keeping the bobbin in place.
15) With 104 nails done, I pulled out 4 medium 3M Command strips and applied them to the back of the rack. Then I pressed the rack to the desk.
16) Finally I loaded her up! Ahhhhhh! So exciting!!!
You can make one, too!
Here's the cost breakdown:
• Three 1"x2"x8' smooth select pine boards: $4.24 each = $12.75
• 1.75 oz. package of #18 5/8" wire nails: $1.30
• 4 sets of medium 3M Command pictures hangers: $5.47 for a value pack of 6 sets. I used a $50 coupon from 3M's website = $4.97
• E-6000 glue: already owned (runs about $6)
• sandpaper - rough and fine grit: already owned (you can get both for less than $8 total)
• scotch tape: already owned (runs about $2)
My budget was under $20!
It took me a few hours over two days to craft this up with many interruptions and an extra trip to Home Depot ;-) Mine measures 21 and 3/4"x 26 and 7/8" and holds 104 spools of thread and 104 bobbins. I thought the wood was super pretty as is, but I'd love to see one painted bright yellow!
Let me know if you craft one up for your sewing space. I'm glad to have this WIP off of my list!
Happy Wednesday!
Let me know if you craft one up for your sewing space. I'm glad to have this WIP off of my list!
Happy Wednesday!
I'm linking up with Freshly Pieced, Sew Much Ado, Someday Crafts, Rae Gun Ramblings, and Under the Table and Dreaming.



Thursday, March 29, 2012
Tutorial: Red and Aqua Bunting and Paper Spinners!
I was so excited to celebrate my sister's birthday yesterday. We're both creative and crafty, so it's been lots of fun to make birthday decorations for each other over the years. After seeing adorable bunting all over Pinterest, I knew I wanted to take a crack at it, too. (If you need a Pinterest invite, let me know!)
I've seen so many beautiful red and aqua quilting projects recently that I was inspired to create my sister's birthday decorations in those colors. There were plenty of red and aqua fabric options at Stitch Lab here in Austin.
I took sections of fabric measuring 8.5"x18" and cut triangles that were 6" wide at the base. I paired up two triangles with wrong sides together and sewed the sides 3/8" from the edges. I chain pieced a bunch, cut them apart then went down the other side chain piecing. I trimmed the edges with pinking sheers before sewing them all through some 1/2" vintage bias tape from my stash of inherited goodies.
I recommend using 1" bias tape so that you have a good 1/2" of wiggle room once it's folded in half. I just sewed down the line making a string of flags as I went, eyeballing the distance between flags.
I put extra flags under the cake plate and platters we were using. I might sew them into proper decor at some point down the line. It would be a cute table topper just to appliqué a big red circle to the middle of those flags with a zig zag stitch.
The paper spinner decorations were made by taking 2"x 4-8" strips of paper and vellum and sewing right down the middle one strip after another. I sewed bunched up sections of leftover bias tape onto the ends to make an anchor I could tape easily onto the ceiling.
If you're reading this blog, making these crafty decorations is likely within your skills set. This makes a great set of reusable party decorations for very little effort. Let me know if you give it a go! I'd love to see your pictures!
I'm linking up with Somewhat Simple. It seems they have an Amazon gift card giveaway, so here's my entry comment for them: My entry into Strut Your Stuff sponsored by Appliances Online and the Bosch Washing Machines.

I recommend using 1" bias tape so that you have a good 1/2" of wiggle room once it's folded in half. I just sewed down the line making a string of flags as I went, eyeballing the distance between flags.
If you're reading this blog, making these crafty decorations is likely within your skills set. This makes a great set of reusable party decorations for very little effort. Let me know if you give it a go! I'd love to see your pictures!
I'm linking up with Somewhat Simple. It seems they have an Amazon gift card giveaway, so here's my entry comment for them: My entry into Strut Your Stuff sponsored by Appliances Online and the Bosch Washing Machines.

Saturday, January 28, 2012
Tutorial: Testing for Color Fastness
You know about my fear of dyes bleeding in finished quilts. Yikes.
I'm in Louisiana visiting my parents this weekend, so I brought along a little hand sewing. Before I cut up more scraps for rose star blocks, I wanted to test the color fastness of some fat quarters I bought. While you're usually pretty safe with quality quilt store fabrics, jewel tones make me nervous. Especially because I like to incorporate so much white in my quilts right now.
To test the color fastness, I gathered the questionable fabrics, some scissors, a container of hot, soapy water, and some paper towels.
I clipped a corner of each fabric, so I could test a small sample.
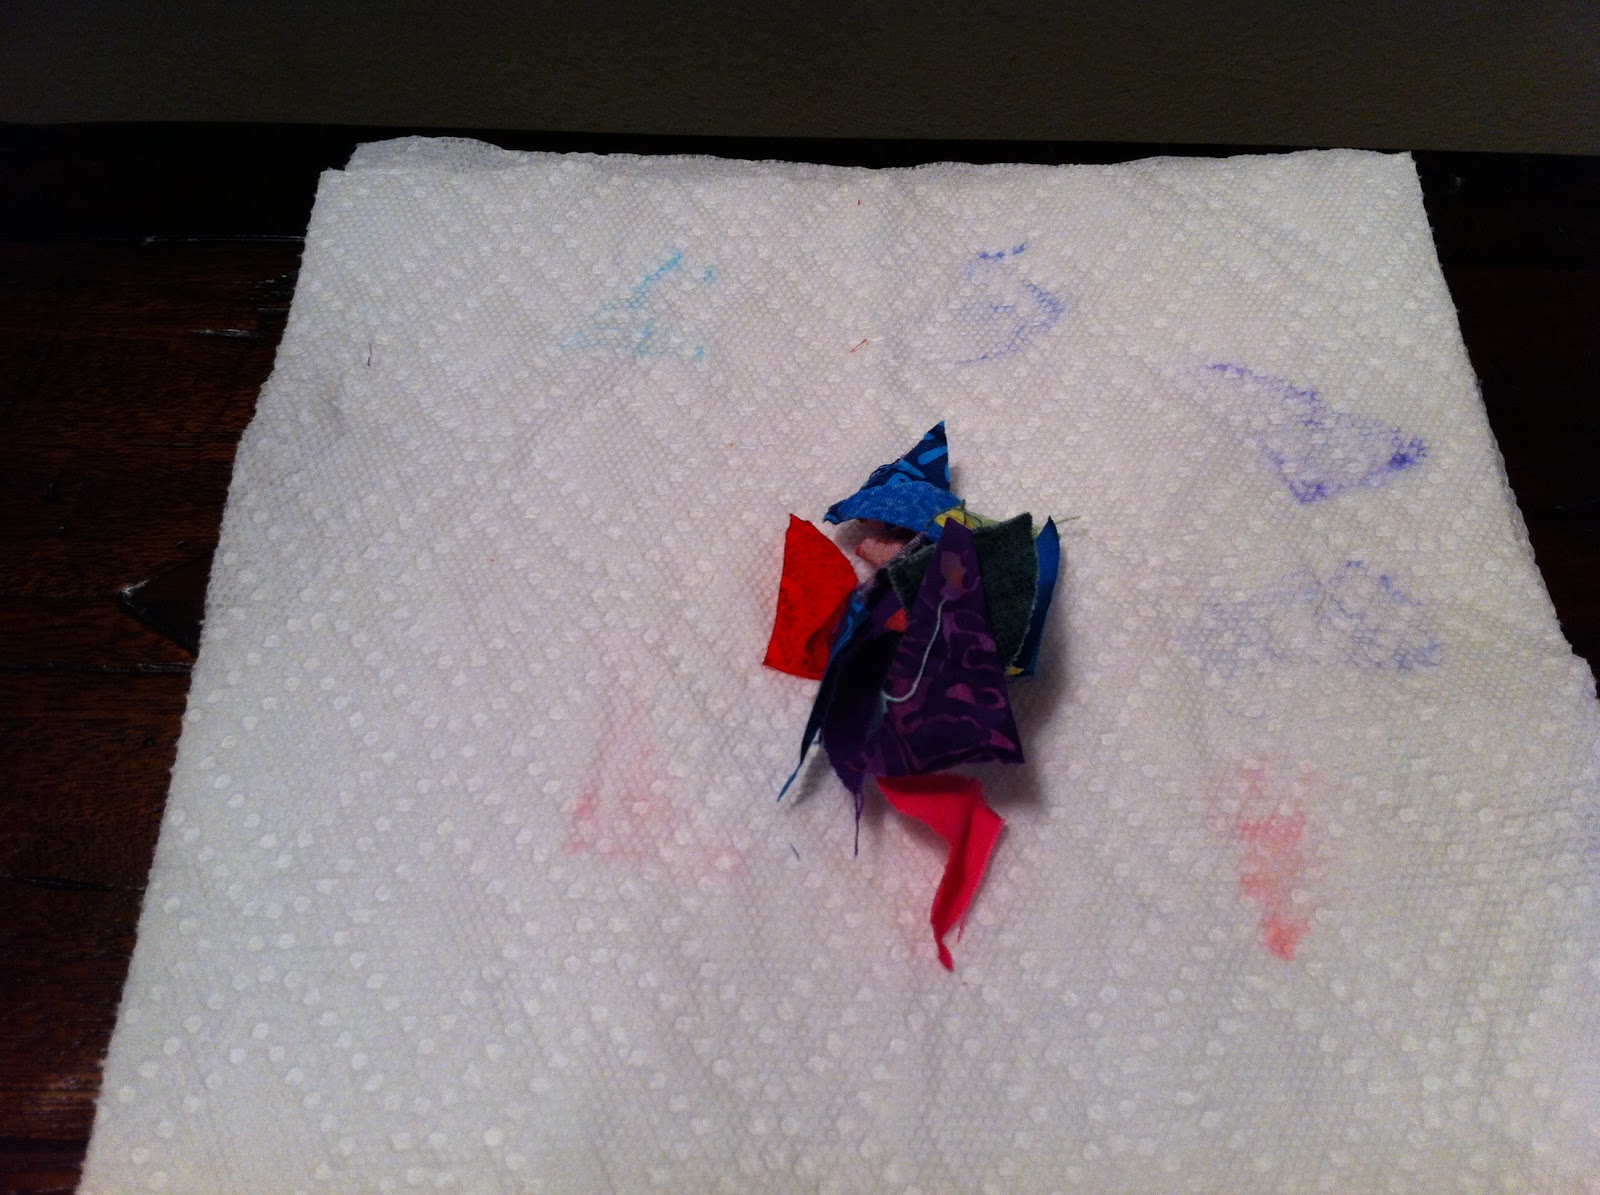
I dunked each clipping in the hot, soapy water and rubbed them with my fingers to make sure they were fully saturated. Then I pulled them out of the water and blotted them with a paper towel. If any dye transferred, I set that sample aside.
Some fabrics were clearly going to be problematic, and there was enough trace dye transfer that I went ahead and hand washed all of the fat quarters in hot, soapy water. Since there were only a few, I just agitated them in a large stock pot which I sat in the bottom of the sink. I did one load with the reds, pinks, and oranges and another load with the purples and blues.
You can see how much purple dye came out of the fabric when I poured out the water. I rinsed all of them and set aside the two which wouldn't quit putting off dye.
We had a fire going, so I just clipped a few at a time to the fire screen a safe distance away from the flames and ironed them once they were dry enough. I didn't want to put them in the dryer, because the fat quarters are too small. So much of the ends would ravel you'd lose a great deal of fabric.
I made sure to mark the two fabrics which wouldn't stop putting off dye with a note reminding me not to use them in any laundered projects. Maybe I'll save this pretty aqua and aubergine for some fabric flowers.
It takes very little time to test your fabric for color fastness. It's worth it to prevent the horror of pulling a quilt out of the washing machine to find that dyes bled into the lighter fabrics.
I hope everyone gets to do some sewing this weekend. Happy Crafting!
I clipped a corner of each fabric, so I could test a small sample.
Here's a shot of a paper towel with dye transferred on it. It was hard to get a picture that successfully showed the dye transfer until the paper towel was dry.
You can see how much purple dye came out of the fabric when I poured out the water. I rinsed all of them and set aside the two which wouldn't quit putting off dye.
We had a fire going, so I just clipped a few at a time to the fire screen a safe distance away from the flames and ironed them once they were dry enough. I didn't want to put them in the dryer, because the fat quarters are too small. So much of the ends would ravel you'd lose a great deal of fabric.
I made sure to mark the two fabrics which wouldn't stop putting off dye with a note reminding me not to use them in any laundered projects. Maybe I'll save this pretty aqua and aubergine for some fabric flowers.
It takes very little time to test your fabric for color fastness. It's worth it to prevent the horror of pulling a quilt out of the washing machine to find that dyes bled into the lighter fabrics.
I hope everyone gets to do some sewing this weekend. Happy Crafting!
Subscribe to:
Posts (Atom)