Tuesday, February 12, 2013

Giant Macaron Coin Purse Tutorial


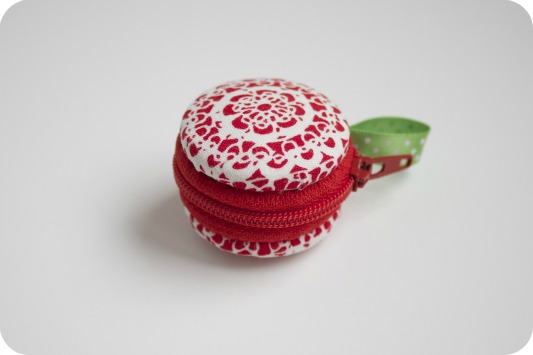
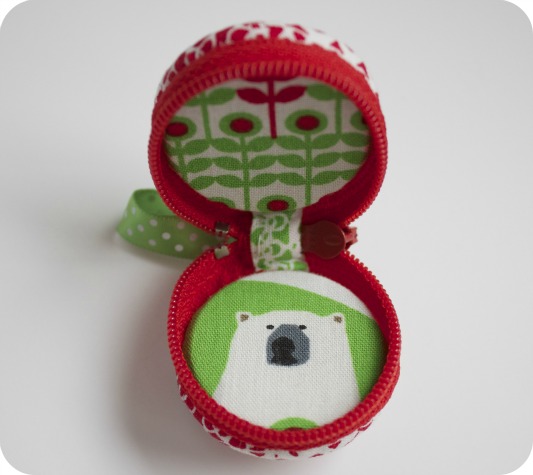
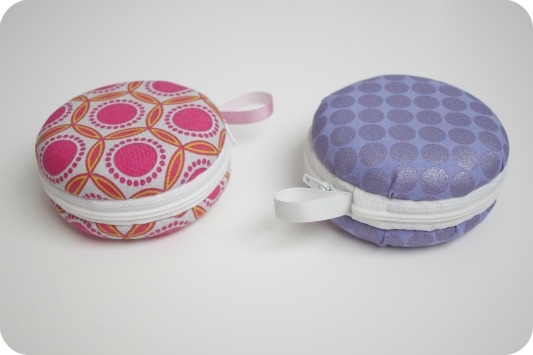
If this adorable Macaron Coin Purse tutorial hasn't made it onto one of your Pinterest boards, yet, you can thank me for helping you rectify this oversight. I made one to swap in the Austin Modern Quilt Guild white elephant gift exchange at our December meeting. I forgot to take a picture, though, so I made another one that I hung on our Christmas tree like an ornament. 


This is tiny, precious, and time consuming hand sewing, to be sure. Unlike a hand pieced quilt, though, you can finish one of these in an afternoon ;-) The tutorial uses 1.5" cover buttons, so the finished "coin purse" is itty bitty. I instantly wanted to make bigger ones. The biggest cover button size you can get is size 100, which measures 2.5". Too small! Plus, I couldn't seem to find that size in bulk, and they cost at least $3.00 per button. Your coin purse needs two.


I wanted something with the same round shape that was cheap and easy to come by. I emailed a company that made promotional items to see about getting the metal shields that they use to make buttons out of that you pin on your shirt that say "I love The Beatles" or whatever your button would say. Under no circumstances was I googling potential solutions on my phone in the dark while I was supposed to be asleep. Noooo sirrrrr. That doesn't even sound like me.


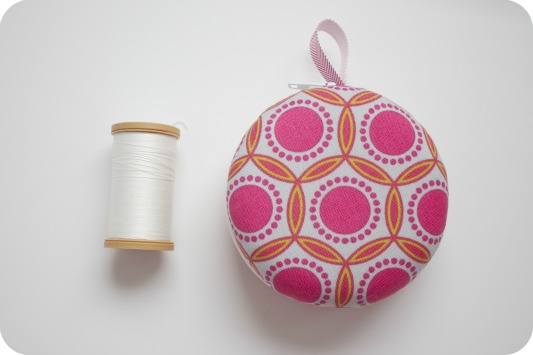
Then it hit me. Mini frisbees. OF COURSE! Then I had to live with the shame of not thinking of it sooner, because Mr. Pins is an active ultimate frisbee player, and there are frisbees all over my house. Awesome. Off I went to Party City the next day, where mini flying disc party favors are $0.10 each. Seriously. I got a couple of dollars' worth :-)


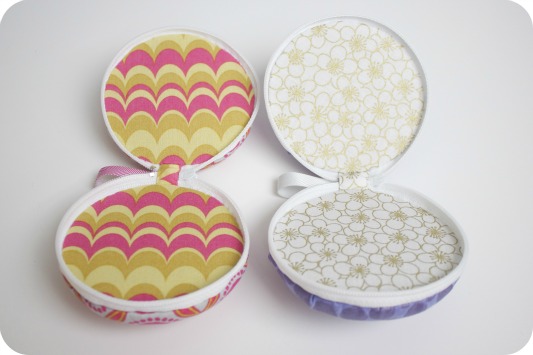
Oh yeah, that's a better coin purse size. The best part is you basically follow the original tutorial to make the giant version. No reinventing the wheel here. 


Here are the differences: 

1) Since a mini frisbee doesn't come with a back like a cover button, just trace your mini frisbee onto a cereal box and cut just inside the line. You'll wrap this part in fabric in place of a cover button back. 

2) My mini frisbees measure 3.5". I cut down a 14" zipper to 12.5". I zipped my zipper closed and measured from 1/8"beyond the end of the zipper pull and cut the zipper off 12.5" from that point. I stitched across the end of my zipper and followed the tutorial instructions from there. 

3) I used about a 4" length of ribbon for the loop.


Now get to a party supply store and stock up! These guys are too cute!

Happy Crafting and Happy Mardi Gras!

Claire

Thursday, February 7, 2013

Fabric Shopping in Salt Lake City

I so enjoyed a family trip to Park City last month. There were eleven of us, and it was awesome. I wasn't planning on doing any downhill skiing since last year's trip to Steamboat Springs, Colorado resulted in both of my big toenails turning purple, disappearing, and finally coming back months later . . . almost as good as new. In Utah I did a lot of running, enjoyed a day of cross country skiing, and drove into Salt Lake City with my parents to visit one of the fabric stores that Mom and I shopped at during Sewing Summit last October.


Pine Needles at Gardner Village in West Jordan is a super cute shop. Turns out they are about to move into a larger space in the same shopping center. Amazing! I love how they have fat quarters cut of almost all of their yardage.


This saves a lot of time at the cutting table and lets me take home a little bit of so many prints I love. Their fat quarters are $3 each. I wish they were $2.75 like some of my other favorite shops in Austin, but you can spend a billion dollars, fill up a loyalty card and get 10% off of your purchase, so that's something to keep in mind.


I snagged lots of fat quarters along with some yardage. The fabric came in handy for working on rose star blocks while I was on the trip. 


I love a good fabric shop. There's nothing like being able to see it all in person :-)

Can anyone identify the print in the center of this block? I'd love to find more :-)

**Update: The fabric is the "Mumsy" print in Blue from Dear Stella's Lanikai line. Thank you so much to Rebecca at Sew Festive for identifying it!!!

Happy Crafting!

Claire

Wednesday, February 6, 2013

WIP Wednesday: Work from the Weekend

I got to do a little sewing out in Wimberley this weekend. Mr. Pins had been working in New York all week, and I left town before he got back. I managed to leave a bag of fabric that I needed at home, though, and he met me half way on Saturday. It's a good thing he did, too. One of the things I checked off my list with that fabric was my do. Good Stitches blocks for the Cheer circle.


These blocks are from a tutorial by Jessica at SewCraftyJess. She just finished a quilt top with this pattern and I can't wait to do the same once all the blocks trickle in through the mail.

The other project I finished with that fabric was this 73" quilt sleeve. Nothing like a few yards of hand sewing to keep you out of trouble ;-)


I had already made another quilt sleeve last month for my Frost Bank mini quilt. 


It's pretty straightforward, just a lot of hand sewing. I used this tutorial. Just note that it's the short ends you sew first. I was confused by the language in the tutorial both times. Fail. 


Finally, I selected and cut fabric for six rose star blocks. Not too shabby! I feel like that's the hardest part. I dragged all of my fat quarters with me so that I could see everything I had when I was picking fabrics. If I can just spend a day cutting every few weekends, I think I can stay ahead of the game!

I'm linking up with Freshly Pieced, Sew Much Ado, Someday Crafts, and Rae Gun Ramblings.

WIP Wednesday at Freshly Pieced  
 

Tuesday, February 5, 2013

Two More Rose Stars

Here are a couple more rose star blocks that I finished over the holidays.


The donkey fabric is from Laurie Wisbrun's Jack and Jenny line, and it just cracks me up. Fabric should make you smile, right?


I got a bunch of sewing done at a retreat over the weekend :-) I'll fill you in tomorrow!

Happy Crafting!

Claire

Wednesday, January 30, 2013

WIP Wednesday: Rose Star Quilt


What's wrong with me? There's a nagging voice in my head that says "Make only giant quilllts." Then there's another voice that says "Beware of longterm projecccts." Clearly these two voices can't always reconcile. Sometimes I end up with wholecloth baby quilts that can be finished in an afternoon, and other times I end up with queen-sized English paper pieced giants heading into year two. Half of my brain loves the enormity of this project and the other is terrified by how long it's taking.


I started my Rose Star quilt in January 2012 during the Superbowl. Now I've got 23 blocks done! I got a few knocked out over the holidays :-) Now's the time to make a plan and come up with some concrete numbers so I know what I'm shooting for.


The "Make only giant quilts" voice says to "make a bed quilt with generous droppps and a pillow tuccck."Fine, fine, fine.

Queen mattress measurements: 60" x 80"
Add 13" drops & 16" pillow tuck: 86" x 109"

To end up with a quilt with those measurements, I need seven columns of 7 rose star blocks and 7 half stars to square off the rows.

That layout measures: 87" x 108"
Subtract 3.5% shrinkage: 84" x 104"

Taadaa! Close enough. Now for the really depressing part. I need a total of 49 blocks and 7 half blocks for this layout. Blurg. That means I need to make 26 more whole blocks and 7 half blocks. I took a photo of my current blocks in what I thought was the final perimeter arrangement this afternoon. When I looked at the numbers again after sunset, I realized that it needed to be pushed out again. Oops.


Just imagine that the red star and the 2 directly below it are pushed out to the left another position. I'll take this picture again in a few weeks when I've knocked out some more blocks. Am I the only one with conflicting voices in my head that drawing me equally to opposite types of quilt making? I'd love to know I'm not the only crazy quilter out there ;-)

Happy Crafting!

Claire

Monday, January 28, 2013

New Year, New Goals

Somehow January is almost over, so I better review my 2012 goals and set some new ones for 2013 pronto!

Reviewing My 2012 Goals: 

1) Find a permanent .com home for this little bloggy.
     - Done! I love being Sewing Over Pins, and I'm so grateful to Mr. Pins for helping me find a home on the web.

2) Make quilts from these patterns I'm crafting up and make the patterns available to everyone!
     - With one pattern for sale in the Craftsy shop, I'm pleased to have blazed a trail.

3) Sew up a couple of baby quilts for some new humans and ones that are on the way.
     - It's hard not to laugh out loud at this. Lots of sweet kiddos had birthdays in 2012, and I'm thrilled to say that quilts I made went home with at least half a dozen of them.

4) Finish this frustrating Storm at Sea quilt at some point. At least the top. I'd be thrilled to piece the top.
    - Blurg. This was a great disappointment of 2012. I was so grateful for everyone's support while I tried to figure out what to do. Ultimately, I decided to walk away from the project rather than try to unpick all of that sewing and re-use pieces where I'd already trimmed off the tips. The next time I try a Storm at Sea, I'll probably go with a paper pieced version.

5) Try not to repeat the mistakes of 2011.
     - Haha, well, I guess I did a fair enough job of that. I've done so much sewing over the last year, and I've picked up lots of new skills thanks to participating in Block of the Month series, hours of classes at Quilt Festival, and seeking out info and tutorials online. At the end of 2011, I couldn't have envisioned how much I would learn and how much sewing I would do over the course of 2012. While I would have loved to have done twice as much, I'm definitely not disappointed, just unrealistically ambitious sometimes ;-)

Here's a recap of some of my sewing in 2012!

It started off innocently enough making baby quilts and testing out my Cascading quilt pattern. By the time summer was fading, I was finishing up two donation quilts. The end of August signaled the beginning of Renegade Holiday Market preparation.


There were lots of smaller projects that kept me busy during the year. I took my first stab at zipper pouches, made a few iPad envelopes for Renegade, and did a little hand embroidery.


I enjoyed making all kinds of bags from my little BB travel purse, to Amy Butler's Everything Bag for toting my crafts, to metal frame clutches to sell at Renegade.

2013 Goals:
1) I'm going to get more quilt patterns put together this year!
     I'm working on a pattern for the Marine Den quilt right now, and I did a lot of work on the Empire quilt pattern while I was sewing for Renegade. I'd also love to share my template and tips for making metal frame purses.

2) Strike a balance between sewing and exercise.
     I was doing great through June, then I lost my way. The summer heat in Austin just gives me an excuse to slack off. By the time I started sewing for Renegade, exercise went completely by the wayside. I've done a great job of running this month, despite being under the weather. Alas, it's going to take more than three runs a week to get me where I want to be.

3) Keep my sewing space organized.
     I came home with lots stuff after Sewing Summit, and much of it never found a home. Somehow it's become acceptable for me to have a pile of stuff on the floor outside of The Clubhouse (aka my sewing space) for months. I'm over it. I'm going to do some decluttering and reorganizing to keep everything functional and tidy.

4) Finish my Summer Sampler Series quilt.
     We're already having 80 degree days in Austin this month. I'm sure we'll get another freeze before it's officially spring, but it's already too hot for the comforter most nights. I'm using flannel instead of batting in this quilt, and it would be great to use it as a cooler alternative in the coming months.

5) Finish the Rose Star Quilt.
     I need to decide how big I'm going to make this thing. Once I know what number I'm going for, I'm going to cut a bunch of blocks so I'm ready to sew whenever. This worked pretty well during the holidays, and I think it's the key to getting this quilt done. This project is already a year old, so it's time to wrap it up!

Happy Crafting in 2013!

Claire

Wednesday, January 23, 2013

Greetings 2013!

Not to worry, I escaped the Mayans' predictions along with everyone else. I definitely found myself overcommitted ever since the beginning of fall, but it's time to find some balance again. I can't wait to tell you about everything. 


Between trips to Denver, Salt Lake City, Houston, Shreveport, Kona, and Park City in that last five months, I don't think I've ever travelled so much. I worked hard to prepare for the Renegade Craft Fair and played hard shopping for fabric in Salt Lake City. There's been lots of quilts, purses, napkins, and rose star blocks plus a Marine Den pattern in the works. 2013 is going to be lots of fun!

Happy Crafting!
Claire