Tuesday, June 12, 2012

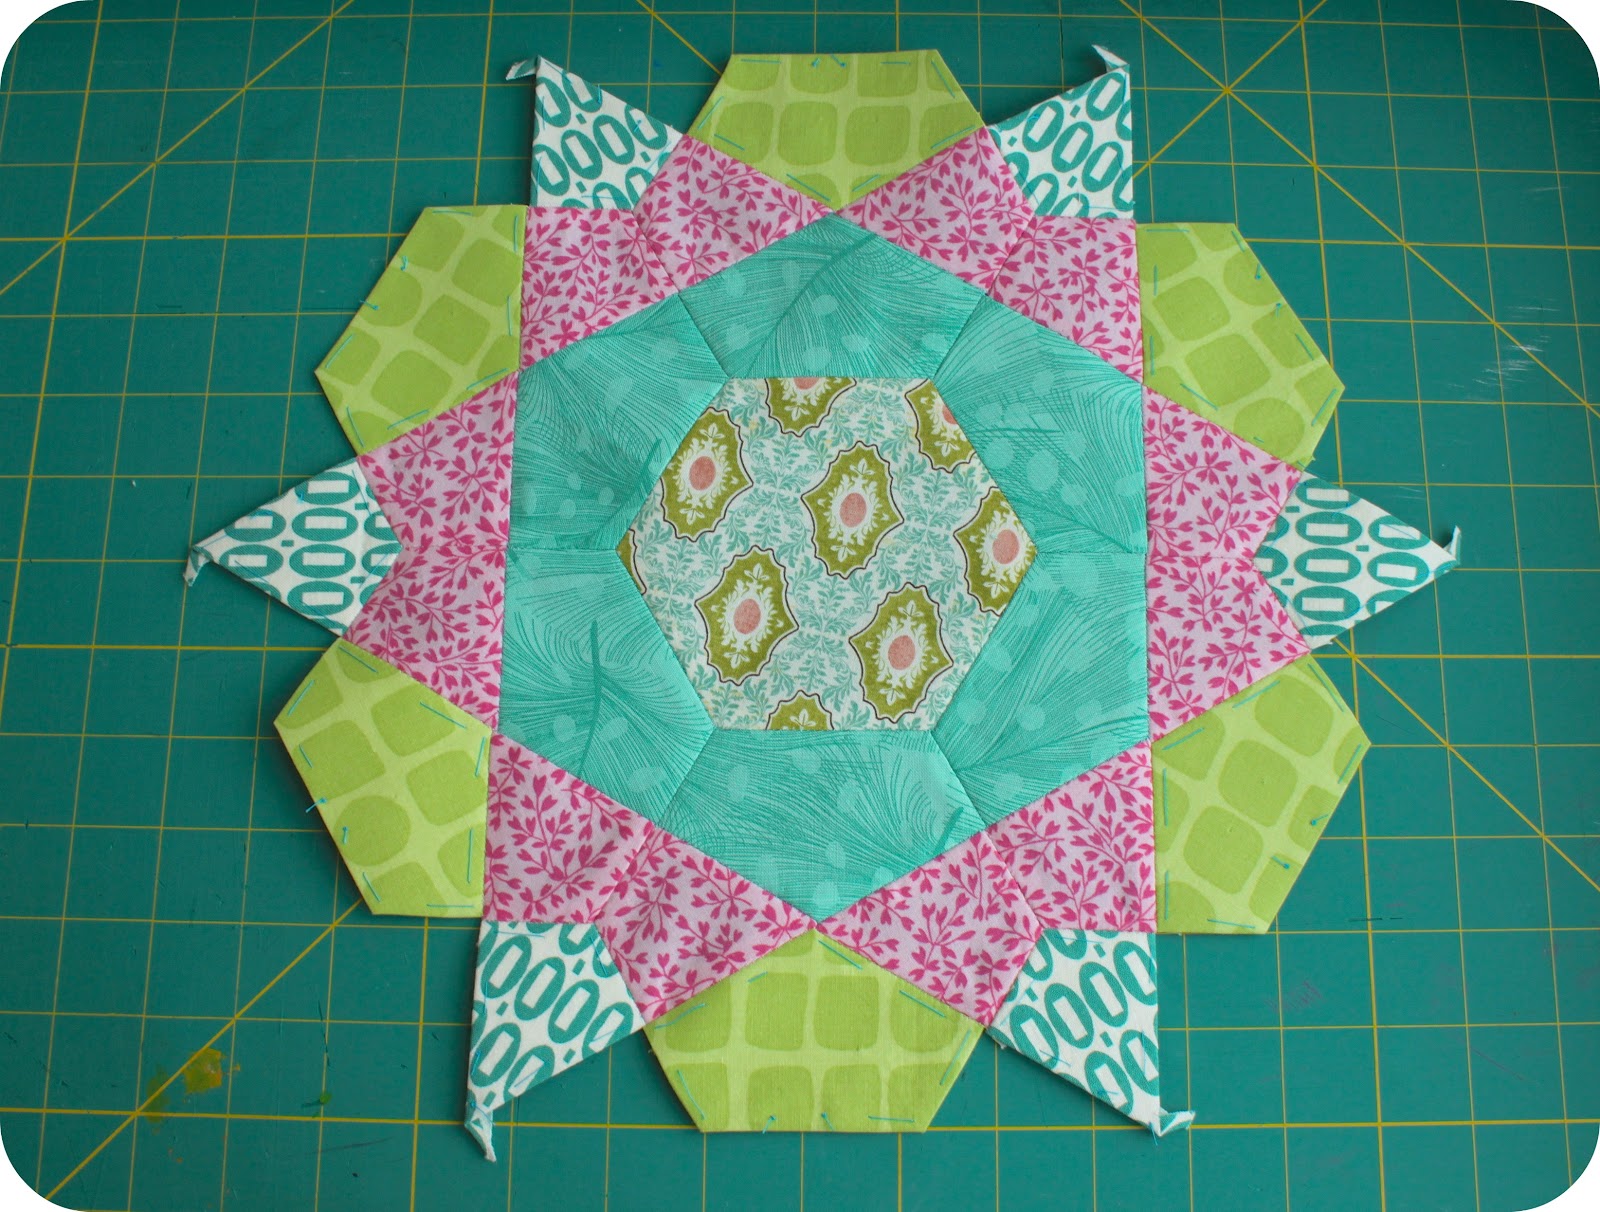
Rose Star Blocks 7 & 8

I know you thought I had no time for sewing, what with being covered in saw dust while making thread storage racks and all. That advance design work has been paying off, though!


I magically got one of these knocked out on Sunday. I did a little sewing in the garden in the morning and some more on the couch that night while watching a movie. 


I didn't stop there, though. I did a little sewing during quilting radio yesterday and finished the block up last night while watching Apple's WWDC keynote video

Just like that, another two blocks for the design wall. Here's the other six!

1. Block 1, 2. Block 2, 3. Block 3, 4. Block 4, 5. Block 5, 6. Block 6

Talkin' Tuesdays is still in full swing tonight. Join us on Twitter! I'm @SewingOverPins ;-)

Happy Crafting!

Monday, June 11, 2012

Tutorial: Bobbin Tamers

My Thread Spool & Bobbin Storage Rack tutorial gives a DIY option for rounding up your, er, loose spools, and keeping them organized with coordinating bobbins. Another great idea shared by The Creative Homemaker comes from a post on the Threads magazine website.


The idea is to use clear vinyl tubing from the hardware store and to cut it into slotted rings to wrap around your bobbins. No more bobbin tails unwinding and making a mess.

My neighborhood big box home improvement store (Home Depot) sells smaller diameter vinyl tubing in 10ft lengths. This tubing is measured by outside diameter (OD) and inside diameter (ID). The Threads magazine website described using 7/8" tubing, but their photo showed 5/8"OD x 1/2"ID tubing. Tricky. I eyeballed my Bernina 1630 bobbins and bought some 7/8"OD x 5/8"ID tubing.


When I got home, I peeled off some tape and removed the adhesive residue with goo gone. I eagerly pulled out my intense Cutco shears to slice it into rings, but I quickly found that cutting even, skinny rings was nearly impossible. I cut a vertical slit parallel to the tube and cut off a rectangle of plastic. I thought cutting the rectangle into strips would be easier. Not really.

On another trip to the hardware store (I've been there a lot recently), I tried to figure out what tool they were using to cut the large gauge vinyl tubing for sale by the foot. At that point I turned around and saw the wall of ratcheting PVC cutters. I recognized them from a landscaping project repairing the irrigation system after shattering a pipe with a shovel.


Back home again, I brought our PVC cutters up to my sewing table and successfully cut a perfect ring off of the end of my tubing. Yay! I played around with the size until I found my preferred width. It's still tricky to get perfect 1/16" precision every time, but it's a huge improvement.


The rings fit on the bobbins differently depending on how full they are. On a bobbin that's not so full, you can overlap the ends or cut some length off the ring if you prefer.

I only own about 20 bobbins, and there's plenty of tubing left on my cutting table. If you're interested in some of these without all of the trips to the hardware store, let me know, and I'll put some in my Etsy shop when I get that organized later this month.


If you live to DIY, here's my budget:

• 10ft length of 7/8"OD x 5/8"ID clear vinyl tubing: $7
• Ratcheting PVC pipe cutters: about $12 (I already owned some)

You could easily spend less than $20 for you and all of your quilty friends to have tidy bobbins!

Happy Crafting!

I'm linking up with Sew Happy Geek.


Sew Happy Geek

Wednesday, June 6, 2012

Tutorial: DIY Thread Spool & Bobbin Storage

Game changer.

Rachel on Stitched in Color pointed out this awesome thread spool and bobbin storage rack from The Creative Homemaker. I pinned it immediately.

My thread lived out of the sun in random organizers in my sewing desk drawers. I made this similar storage rack to fit perfectly on the end of my sewing desk out of direct sunlight. Drawer space reclaimed!

Supplies:
Three 1"x2"x8' smooth select pine boards
1.75 oz. package of #18 5/8" wire nails
E-6000 or wood glue
Four sets of medium 3M Command pictures hangers
reciprocating saw or hand saw
sandpaper - rough and fine grit
painter's tape or scotch tape
pencil
ruler
calculator


1) I bought three 1"x2"x8' smooth pine boards from the big box home improvement store (Home Depot). I knew I wanted to construct the rack like a ladder, so I cut two long pieces measuring 26 and 7/8"for my rails (the sides) and nine shorter pieces measuring 20 and 3/16"for my rungs (the shelves).


2) I used rough sandpaper to smooth out the cuts from the saw and fine sandpaper to barely smooth the edges of all pieces. I picked the smoothest edge of the board to be the front and marked the back with an X.


3) Mr. Pins jumped in with the math to determine how far apart to position the shelves for even spacing. Since the actual measurement of these 1"x2"s is .75"x1.5", the spaces between my shelves is about 2.5" - give or take 1/8" here and there.


4) I relocated to my sewing room for the assembly. With the backside of the rack facing up on my cutting table, I taped all of the shelves to the two long side pieces.


5) I flipped the whole rack over by squeezing tightly with my arms when I picked it up. I scooted one side past the edge of the table and used the tape as a hinge to expose the ends of the shelves where they touched the long side piece.


6) I dabbed E-6000 glue on the ends of the shelves before hinging the side back against the ends of the shelves. Then I scooted the whole rack back over to rest on the table again.


7) I taped each shelf to the long side piece on the front side of the rack to serve as a clamp while the glue dried. I wiggled the rack to make sure that it was in line with the edges of the table, that way I knew it would dry at right angles. I let the glue cure for an hour or so, then I repeated this on the other side of the rack to glue the shelves to the other side piece. Then I went to bed.


8) The glue was completely dry this morning, so I used one of my nails and a bobbin to decide how high up on the edge of the shelf each nail would need to be. I didn't want my bobbins to stick up over the edge of the shelves and make the spools of thread harder to remove.

9) I measured and marked a horizontal line on the front sides of the 8 shelves so I would know where to draw dots for the nail holes.


10) I used spools of thread to determine that I can fit 13 spools on a shelf. I wanted the spools on each end of the shelf to be 3/4" from the sides. I measured from those points to mark the spot for the middle nail. Then I kept dividing numbers to find middle points until I made marks for 13 nails. They're all about 1 and 9/16" apart.


11) I used a 24" acrylic ruler to help me mark nail spots on 8 shelves. (The 9th "shelf" pieces is the top of the rack, and I didn't want to put bobbins on it.)


12) Once I marked all of the nail spots with a pencil, I came back around with my hammer and tapped each of those holes with a nail to visibly indent the wood.


13) Then I erased my horizontal pencil lines.


14) I'm right handed, so I worked from right to left barely hammering in #18 5/8" wire nails for the bobbins. Once I had a row of nails set, I centered a bobbin on each nail and hammered the nail just deep enough so that the bobbin could rest on the nail with the head of the nail keeping the bobbin in place.


15) With 104 nails done, I pulled out 4 medium 3M Command strips and applied them to the back of the rack. Then I pressed the rack to the desk.


16)  Finally I loaded her up! Ahhhhhh! So exciting!!!


You can make one, too!

Here's the cost breakdown:

• Three 1"x2"x8' smooth select pine boards: $4.24 each = $12.75
• 1.75 oz. package of #18 5/8" wire nails: $1.30
• 4 sets of medium 3M Command pictures hangers: $5.47 for a value pack of 6 sets. I used a $50 coupon from 3M's website = $4.97
• E-6000 glue: already owned (runs about $6)
• sandpaper - rough and fine grit: already owned (you can get both for less than $8 total)
• scotch tape: already owned (runs about $2)

My budget was under $20!

It took me a few hours over two days to craft this up with many interruptions and an extra trip to Home Depot ;-) Mine measures 21 and 3/4"x 26 and 7/8" and holds 104 spools of thread and 104 bobbins. I thought the wood was super pretty as is, but I'd love to see one painted bright yellow!

Let me know if you craft one up for your sewing space. I'm glad to have this WIP off of my list!

Happy Wednesday!

I'm linking up with Freshly Pieced, Sew Much Ado, Someday CraftsRae Gun Ramblings, and Under the Table and Dreaming.


WIP Wednesday at Freshly Pieced  
 
UndertheTableandDreaming Sew Happy Geek

Tuesday, June 5, 2012

Movin' & Shakin'

Today was my day off from exercise, but I had a long list of projects to cross off the list. 


What is it about sewing lately that has me spending so much time at the hardware store? Looking up and down the aisles through a quilter's eyes is fun, because I find myself trying to think of alternative uses for the home improvement supplies. Hopefully today's WIP will be ready to show off tomorrow. Why can't I get any of these projects done in one day?


Sewing is such stationary business. Unless you're crawling around on the floor basting a quilt, it's easy to get focused at the machine and end up sitting for hours. When my toes were injured at the beginning of the year, it was great that I could still sew. Now that I'm healed, I get to exercise away the consequences of those shenanigans.

I'd love to hear any tips or thoughts on keeping your body healthy while still living the quilty dream! The quilting community should be an active one - not just online, but in life ;-)

Monday, June 4, 2012

A Design Wall in The Clubhouse!

Design Wall crafts were conquered at last today, and I am thrilled!
8'x8' of Design Wall Magic!

Our generous neighbors let us borrow their truck so Mr. Pins and I could fetch two 4'x8' foam insulation boards from the big box home improvement store over the weekend, and I finally had time to make it all happen today. I was most inspired by the tutorial over at Cut to Pieces.


I snagged a package of King Size 120"x120" cheap, high loft poly batting on sale at JoAnn months ago for this project.

I got the thickest boards they had. They measure under an inch thick and were less than $14 each.

I won't try to improve on the Cut to Pieces tutorial, but here are tips from my experience:
- Folding only 3" of batting onto the back was sufficient. 
- My regular desk stapler could successfully attach one layer of batting to the boards, so I didn't need a heavy duty staple gun.
- I stapled near the edge of the batting on the back and then put duct tape over the staples sealing the edge of the batting on the back of the boards like Elizabeth did over at Oh, Fransson!
- I had two rolls of duct tape in the house, and the Duck Tape brand was much better quality than the Tyco Adhesives Nashua brand. The Duck Tape tore and handled more easily.


- I experienced a math fail when determining the location for my power outlet cutout. I patched the hole in the foam with a scrap from the cutout and duct taped it to the front of my board. The duct tape shows through the batting, so I wish I'd used clear packing tape. If OCD tendencies take over, I suppose I could attach some sort of white fabric around the outlet hole to make the duct tape look less ugly. 


- I used six 3M picture hanger tabs to hang the boards on our textured walls. They function like hook and loop. I'm not convinced this will be sufficient, but the wall hasn't come crashing down yet. If you're trying to avoid putting holes in your wall, you can give this a go.
- It took me four hours to do this project by myself.


I'm really happy to have a Design Wall of my very own, now. I won't have to lay everything out on the floor. Mr. Pins says he's glad I won't be talking about it all the time anymore. Ha!

I'd love to hear about your Design Wall experience :-)

Happy Crafting!

Friday, June 1, 2012

May 2012 Recap

June already?! Summer is here. There's no getting around it. I spent so much time working on house projects this month, I figured I wasn't very productive in the sewing department. So not true!

Black Sheep Don't Sleep Baby Quilt

This was such a cute quilt. It came together without any surprises, even though my brain did all of the quilty math. Always risky. I would happily use these organic Monaluna fabrics in another project.


Sixth Rose Star Block

Another month with only one completed block. This one's not my favorite. My design skills are limited. I've added a few fat quarters to my stash to give me additional design options, though. This can only help.


Rose Star Block Template Cutting

This is the secret to Rose Star block success: lots of paper templates. Why? If you have plenty of templates on hand, then you can get to designing!


Rose Star Block Designing

If I can do the design work ahead of time, The Clubhouse only has to be in a state of utter destruction for a brief period of time (currently in its second week). If I can stockpile designed blocks that are ready for sewing, then I can knock out the fun sewing part whenever I have found time: while getting an oil change, while sitting through the same light for a third time in traffic, or while Mr. Pins watches action movie trailers on the Apple TV. Ah, the joys of portable hand sewing.


Circle of Geese Pezzy Print Mini Quilt

This was a fun block to make. Nothing like a little foundation piecing with paper to complement the English paper piecing. I would definitely recommend giving this block a go with the free template!


Summer Sampler Series Six Pointed Star Block

I made this block in the wee hours of the night, but I'm pleased with how it turned out, and I'll definitely make another one to keep for my own Summer Sampler Series set. This one is destined for an Austin Modern Quilt Guild donation quilt. Fun fact: I starched this block so heavily it could have walked away on its own ;-)


Ace of Spades Mini Quilt - go VOTE!

My final project in May included some needle turn appliqué and embroidery. This project included fabric rescued from my Mom's stash, ironing board cover, linen, and a little gold lamé in addition to some of my favorite prints. This was a great exercise is sewing with other mediums, and you can still VOTE FOR ME on Sew Happy Geek for at least a few more hours.

I can't believe I've made six quilts this year (not including the minis). Shocking admission: I've never kept a quilt I've made. That really needs to be rectified. I also really need to finish the quilt pattern I've been working on and get an Etsy shop open. June could be an exciting month!

How was your month of May? Do you have big plans for June?!


Lily's Quilts  


I'm linking up with Lily's Quilts Fresh Sewing Day and amylouwho's Fresh Sewing Friday.

Thursday, May 31, 2012

Desperate for a Design Wall

Have you voted for my Ace of Spades mini quilt in SewHappyGeek's PLAY competition? Go vote! I'm lucky number 13.


I didn't post yesterday, because I was so sure I would get to share a WIP design wall post. Alas, it just didn't work out that way yesterday, or today. It's high on my priority list to make a design wall happen, but there's a lot going on. Getting two big sheets of insulation from the home improvement store requires borrowing a truck. Ideally I'd have help from Mr. Pins, but I'm prepared to fly solo if the weather will cooperate. 


I've resorted to desperate measures in the meantime. This is a poor substitute for a design wall. Wish me luck in my crafty endeavors. 

Good luck with yours, too! And go VOTE!